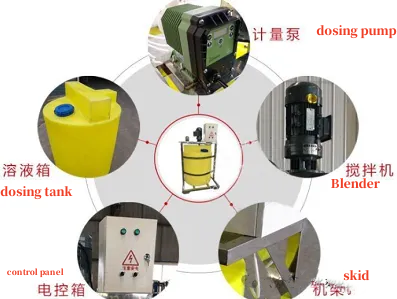
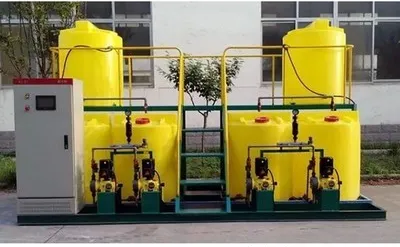
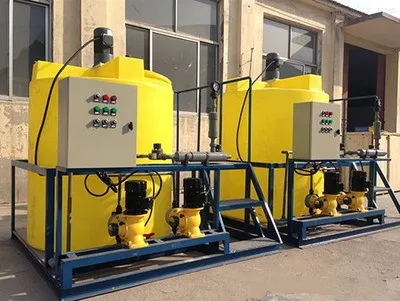
Les systèmes de dosage automatique consistent en une configuration intégrée qui comprend un système de mesure et de dosage, un système de préparation de solution chimique, un système de sécurité et un système de contrôle. Ces systèmes se caractérisent par leur conception compacte, leur facilité de maintenance, leur faible coût et leur transportabilité.
26 décembre 2024
Considérations de fonctionnement importantes pour les systèmes de dosage automatique
1. Contrôle de la pompe doseuse : Le moteur de la pompe doseuse est contrôlé par un entraînement à fréquence variable. Si la pompe ne fonctionne pas correctement, cela peut indiquer un défaut dans le variateur. Dans de tels cas, activez la pompe de secours (normalement, l'une est utilisée tandis que l'autre est en veille) et suivez les instructions manuelles pour réinitialiser le défaut.
2. Entretien de l'indicateur de niveau : Le matériau peut adhérer à l'indicateur de niveau en raison de l'humidité, affectant ainsi ses performances. Vérifiez et nettoyez régulièrement l'unité de dosage (recommandé pour chaque équipe).
3. Entretien de l'armoire de commande : Empêchez l'eau de pénétrer dans les composants électriques de l'armoire de commande. Gardez la porte de l'armoire fermée pendant le fonctionnement et ne lavez pas l'armoire avec de l'eau, car cela pourrait endommager les composants électriques.
4. Contrôles de corrosion : Inspectez régulièrement les pièces mécaniques qui entrent en contact avec des produits chimiques, car de nombreux agents de dosage sont corrosifs. Remplacez rapidement tout composant endommagé.
5. Intégrité du tamis du doseur : Si le tamis du doseur à l'intérieur du système de dosage est endommagé, remplacez-le immédiatement pour empêcher les particules plus grosses de pénétrer dans le doseur à vis, ce qui pourrait endommager la vis ou le moteur d'entraînement.
6. Entretien de l'indicateur de niveau de pression : Vérifiez et nettoyez la membrane des deux indicateurs de niveau de pression chaque mois.
7. Surveillance du flux de matériaux : étant donné que certains produits chimiques peuvent être visqueux, assurez-vous que les tuyaux d'alimentation sont débloqués, en particulier près de la sortie de la trémie et des points de décharge.
8. Fonctionnalité de la trémie : ouvrez le couvercle de la trémie tout en vous assurant qu'il y a une aspiration vers le bas. S'il n'y a pas d'aspiration ou de refoulement, vérifiez s'il y a des blocages dans les conduites d'alimentation (vérifications recommandées toutes les 20 heures de fonctionnement).
9. Vérifications des éléments chauffants : La trémie est équipée d'un élément chauffant. Si le tuyau d'alimentation reste froid après un certain temps, le chauffage peut être endommagé et doit être vérifié ou remplacé.
10. Fonctionnement des vannes : Les vannes d’entrée et de sortie sont des vannes à bille automatiques. Si l'eau continue de couler après la fermeture de ces vannes, elles peuvent être défectueuses et doivent être inspectées et remplacées si nécessaire.
11. Directives de fonctionnement de la pompe : Ne faites pas fonctionner la pompe doseuse à sec ou à l'envers. Assurez-vous que les vannes d'entrée et de sortie sont ouvertes avant de démarrer la pompe et pré-remplissez-la avec le fluide.

Méthodes de dosage chimique
1. Agent d'élimination du chlore
Calculez la quantité de dosage en fonction de l'apport d'eau d'origine :
– Pour chaque 57 litres d’eau pure, la quantité de dosage (grammes) doit être ajustée en fonction du débit d’eau entrant. Réglez le doseur sur environ 2,5 litres par heure.
– Remarque : Si la concentration de chlore dépasse 0,5 mg/l, doublez la dose d'élimination du chlore. Calcul : Multiplicateur de dosage = Concentration en chlore / 0,5.
2. Ajout de floculant
Pour les sources d’eau (eau du robinet) dont la turbidité est inférieure à 5 NTU :
– Pour 57 litres d'eau pure, configurez votre doseur pour ajouter les grammes de floculant spécifiés à raison d'environ 2,5 litres par heure.
– Si l’eau de source est une eau souterraine, une eau de surface ou de l’eau récupérée concentrée, doublez la dose de floculant. Calcul : Multiplicateur de dosage = Turbidité / 5.
3. Inhibiteur de tartre
Lorsque la dureté de l'eau est comprise entre 50 et 100 mg/l (équivalent carbonate de calcium) :
– Pour 57 litres d'eau pure, configurez la machine de dosage pour ajouter un inhibiteur de tartre à raison d'environ 2,5 litres par heure.
– Remarque : Si la dureté dépasse 100 mg/l, doublez la concentration d'inhibition du tartre. Calcul : Multiplicateur de dosage = Dureté / 100, mais ne dépasse pas 10 fois.
Améliorer la répétabilité des pompes doseuses
Pour améliorer la précision du dosage lorsque la sortie de la pompe est à pression atmosphérique, pensez à installer un ressort dans la vanne de refoulement de la pompe. Une soupape de contre-pression en fin de ligne constitue également une méthode efficace pour améliorer la répétabilité.
Réglage de la soupape de contre-pression
1. Assurez-vous que la pression ne dépasse pas la plage de fonctionnement de la pompe doseuse.
2. La pression à l'extrémité refoulement de la pompe doit être d'au moins 1 bar supérieure à la pression à l'extrémité aspiration.
Choisir la bonne taille d'amortisseur d'impulsions
Pour amortir 90 % des pulsations, calculez le volume minimum de l’amortisseur d’impulsions (en ml) en multipliant le débit de la pompe doseuse par course (en ml) par 26.
Réglage de la pression de la soupape de sécurité
Ajustez le réglage de la pression de la soupape de sécurité dans la plage de pression de service nominale de la pompe doseuse. Elle ne doit pas dépasser la pression de service maximale de la pompe. Par exemple, si la pression de service est de 3 bars, réglez la soupape de sécurité à 3 bars ou moins pour garantir un bon fonctionnement et éviter les dommages à la pompe causés par une surpression.
Calcul de la hauteur d'aspiration pour un liquide non aqueux
Si le fluide transporté n’est pas de l’eau, divisez la hauteur d’aspiration nominale de la pompe doseuse par la densité du liquide pompé.
Quand utiliser l’aspiration auto-amorçante
L’aspiration auto-amorçante peut être utilisée dans les situations suivantes :
1. Lorsque le liquide mesuré présente une forte volatilité.
2. Lorsque le liquide a une densité relative relativement élevée.
3. Lorsqu'une fréquence de course élevée est requise.
4. Si la pompe doseuse fonctionne dans des environnements à haute altitude.
5. Dans les applications sur site nécessitant un grand réservoir de stockage, où l'auto-amorçage serait peu pratique.
Prévention de la corrosion dans les têtes de pompe/joints
Pour éviter les problèmes courants de corrosion des têtes de pompe lors du dosage d'acides, de chlorures, de fluorures et de peroxyde d'hydrogène, choisissez les matériaux de tête de pompe appropriés en fonction de la concentration et de la température de fonctionnement des produits chimiques. Cette sélection peut nécessiter une consultation avec le fabricant pour de meilleurs résultats.

Instructions d'utilisation du système de dosage
1. Installation du pH-mètre : installez le pH-mètre dans le port désigné de l'unité de dosage et connectez tous les tuyaux associés, en vous assurant que tous les raccords filetés sont bien fixés pour éviter les fuites.
2. Connexion de l'alimentation électrique : ouvrez l'armoire de commande électrique et connectez l'alimentation électrique au moteur de la pompe doseuse, en vous assurant qu'elle répond aux spécifications requises (configuration triphasée à quatre fils).
3. Fermez le robinet de vidange : assurez-vous que le robinet de vidange est fermé avant de continuer.
4. Préparation de la solution chimique : mesurez les volumes de produits chimiques et d'eau en fonction de la concentration souhaitée de la solution. Ajoutez les produits chimiques dans le réservoir de solution et ouvrez le robinet d'eau pour remplir jusqu'au niveau requis.
5. Préparation de la solution : versez le produit chimique (solide ou liquide) dans le réservoir de solution et ouvrez le robinet d'eau. Une fois que le liquide atteint le niveau requis, arrêtez le débit d’eau. Réglez le système de dosage au dosage souhaité et ouvrez la vanne du réservoir de solution pour commencer le dosage.
6. Dosage du produit chimique : ouvrez la vanne du système de dosage, réglez la pompe doseuse au volume requis et démarrez la pompe pour ajouter le produit chimique au point de dosage. Ajustez continuellement le débit de la pompe doseuse pour l’aligner sur les exigences opérationnelles. Si cela ne répond pas aux besoins, réajustez la concentration de la solution préparée.
7. Élimination de la solution résiduelle : tout matériau restant dans le réservoir de solution peut être éliminé via le tuyau de vidange et le niveau de liquide peut être surveillé à l'aide de l'indicateur de niveau.
8. Alerte de niveau de liquide bas : si le liquide tombe en dessous du niveau bas désigné, la pompe doseuse s'arrêtera automatiquement.
9. Surveillance du pH : La pompe doseuse s'arrêtera automatiquement si le niveau de pH dépasse ou descend en dessous des valeurs prédéfinies (reportez-vous au manuel du pH-mètre pour la configuration).
10. Contrôle de conductivité : Si la conductivité dépasse la limite définie (voir le manuel du conductimètre pour les réglages), ouvrez le robinet de vidange pour éviter tout débordement jusqu'à ce que la conductivité revienne en dessous du seuil.
11. Surveillance de la corrosion : reportez-vous aux instructions ci-jointes pour le dispositif de surveillance de la corrosion concernant son fonctionnement.
12. Fonctionnement de la pompe doseuse : suivez les instructions spécifiques du manuel d'utilisation de la pompe doseuse pour son fonctionnement.
13. Nettoyage régulier : En fonction de la propreté des produits chimiques, le réservoir de solution doit être nettoyé régulièrement pour maintenir l'hygiène et les performances.
En adhérant à ces instructions d'utilisation et précautions détaillées, les utilisateurs peuvent garantir le fonctionnement efficace du système de dosage automatique, en maintenant des performances et une sécurité chimique optimales.

Comment choisir l’équipement de traitement d’eau pure adapté à vos besoins ?
10 novembre 2025
How to Choose the Right Pure Water Treatment Equipment for Your Needs? (by ROAGUA – Professional Water Treatment Equipment Manufacturer, China)
Transformez l’eau boueuse en eau propre : purificateur d’eau par ultrafiltration en acier inoxydable ROAGUA pour l’Afrique
5 novembre 2025
De l’eau propre pour chaque village – Purificateur d’eau par ultrafiltration en acier inoxydable ROAGUA conçu pour les conditions d’eau difficiles de l’Afrique


